Submitted by craig on Mon, 08/26/2013 - 11:28pm.
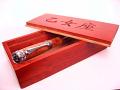
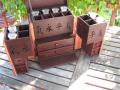 This project grew out of a gift idea for my wife's birthday, an apothecary style cabinet to store perfumes and other items. After searching for antique apothecary cabinets on-line, I stumbled across this 19th century apothecary set and started my planning to reverse engineer the dimensions. The core dimension I decided on was a small perfume bottle, approximately 1 inch in diameter, and 1.75 inches tall. Using that as a guide, I calculated the smaller drawer sizes to allow for 8 bottles. From there, I calculated the remaining dimensions based on plywood and board sizes I wanted to construct the cabinet from. I would estimate about 6 hours of planning and stock layout, 118 individual pieces.
The drawers and container space is constructed from 3/8 inch oak plywood, the outer cabinet is 1/2 inch aspen, the fretwork from 1/8 in birch plywood, and the drawer pulls and feet from turned purpleheart.
Drawer construction posed the biggest difficulty, I acquired a 1/8 inch dado bit for my router, but after a few dry run attempts, ultimately decided to use the table saw to cut the dado groves, using the kerf of the blade for the width. The second problem came with inconsistent stock width in the 3/8 in plywood. I quickly realized that my tolerances for the drawers was a bit tight, so the belt sander was employed to reduce the width. In retrospect, I should have built the drawer carcass first, then taken closer measurements for the drawers, rather then presuming the stock sizes would be exact. While an unexpected annoyance, the sanding did not take a significant amount of time.
This project grew out of a gift idea for my wife's birthday, an apothecary style cabinet to store perfumes and other items. After searching for antique apothecary cabinets on-line, I stumbled across this 19th century apothecary set and started my planning to reverse engineer the dimensions. The core dimension I decided on was a small perfume bottle, approximately 1 inch in diameter, and 1.75 inches tall. Using that as a guide, I calculated the smaller drawer sizes to allow for 8 bottles. From there, I calculated the remaining dimensions based on plywood and board sizes I wanted to construct the cabinet from. I would estimate about 6 hours of planning and stock layout, 118 individual pieces.The drawers and container space is constructed from 3/8 inch oak plywood, the outer cabinet is 1/2 inch aspen, the fretwork from 1/8 in birch plywood, and the drawer pulls and feet from turned purpleheart.
Drawer construction posed the biggest difficulty, I acquired a 1/8 inch dado bit for my router, but after a few dry run attempts, ultimately decided to use the table saw to cut the dado groves, using the kerf of the blade for the width. The second problem came with inconsistent stock width in the 3/8 in plywood. I quickly realized that my tolerances for the drawers was a bit tight, so the belt sander was employed to reduce the width. In retrospect, I should have built the drawer carcass first, then taken closer measurements for the drawers, rather then presuming the stock sizes would be exact. While an unexpected annoyance, the sanding did not take a significant amount of time.
Submitted by craig on Sun, 10/16/2011 - 10:34pm.
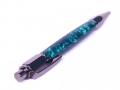
 Here are some small turned items from the weekend of October 15th, 2011. The weather is decidedly getting cooler as autumn takes a foot hold in northwest Ohio. I probably won't have too many more days to spend at the lather this year, so I pressed to finish quite a few items ahead of the holiday rush. Each turning contains a description of the item and the wood used.
Tags: turned pens
October 2011 Turnings
login to post comments
Submitted by craig on Sun, 08/14/2011 - 7:51pm.
 The results of several weeks of preparation and turning time. I spent a portion of that time setting up several segmented blanks which appear on the classic rollerball screw cap pens and the slimline pro series pen and pencil kit. Individual descriptions are with each image.
August 2011 Turnings
login to post comments
Submitted by craig on Mon, 07/04/2011 - 2:37pm.
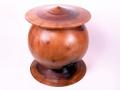
 It has been a long time since I have done any wood turning, at least since December 2010 when I turned out a bunch of Christmas gifts in a hurry. Since then, I've been getting more and more involved my Amateur Radio hobby with the Fulton County ARC, so much in fact that I was taken by surprise when I realized it was July and I had not even spun up my lathe once. To be fair to myself, I did complete a major workbench project in my shop to make woodworking more enjoyable. So this weekend I thought I would give the new bench a try to make sure I calculated optimal height for my lathe which should help reduce fatigue when turning more time intensive projects. To give it a test, I grabbed the first chunk of tree I saw on my shelf, an unknown species, and said "I'm turning you". I suspect it might be ash, but not entirely certain. I chucked it up with the thought of turning some kind of vessel or container. When I start turning without a solid end plan, anything is possible and I usually let the grain guide me. The end result is this container with a purple heart lid (I will use that entire sheet of purple heart, I swear to god I will). I noticed the start of a fracture near the lip from a hidden check already in progress, so I grabbed my tin snips and a sheet of hobby metal and made a quick band to hold off any further separation. The container is about 5 inches high and about 4.5 inches in diameter at the widest point. This was strictly an exercise in testing the bench height and my comfort with the setup. With any luck and cooler summer weather, I hope to start creating pens and yo-yos again, along with larger turnings like bowls and containers.
Look, I remember how to use a lathe!
login to post comments
Submitted by craig on Fri, 12/31/2010 - 10:05pm.
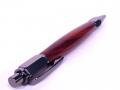
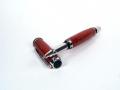
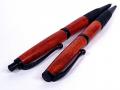
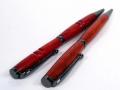
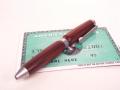
 Some special projects done around the Christmas season 2010. These include a turned acrylic shaving set for my wife. The kit accepts Mach 3 razor heads and features a premium grade badger hair brush head. The material is black and white ribbon acrylic which will definitely withstand exposure to water. I turned a second set for a friend out of TruStone, which I hope to have pictures of soon. The second listed project is a letter opener and ballpoint pen desk set for our retiring Radio Club president who served for a number of years in that position. The pen case is constructed from Brazil Cherry with baltic birch for the bottom panel and slide base. The letter opener and pen are European style with platinum (rhodium) plated hardware accents. Both are dressed in Honduras Rosewood and finished using CA/BLO and high speed buffing.
Holiday 2010
login to post comments
Submitted by craig on Mon, 09/06/2010 - 3:16am.
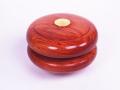
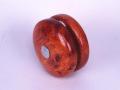
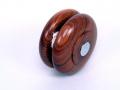
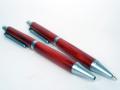
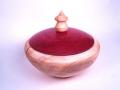 Labor Day weekend is always a busy one with the start of the Fulton County Fair and miscellaneous home projects, but I did manage to find some time to sneak out to the workshop and spin up the lathe. I finally enabled a slideshow feature on this website, this link will load up all of the additional images for each project. The first project is a lidded container made from maple and purpleheart. I misjudged the amount of maple I had to work with and really wanted a lid for this container. A bit of leftover purpleheart fixed that problem. The container is about 5 inches in diameter at the widest point and about 4 inches tall overall with the finial. The next project is a honduran rosewood classic profile yo-yo with gold plating. The finis is a coat of boiled linseed oil followed by a tripoli/white diamond/carnauba wax high speed buffing. This yo-yo has a sleeve bearing for good sleeping and is exceptionally well balanced. The next project is a Wall Street II profile ballpoint pen with twist mechanism. The wood is an Ebonized Madrone Burl, a pacific hardwood with rich dark textures. The next pen is a Tycoon style rollerball also dressed in Ebonized Madrone Burl. The Tycoon is simply a great looking pen.
Labor Day weekend is always a busy one with the start of the Fulton County Fair and miscellaneous home projects, but I did manage to find some time to sneak out to the workshop and spin up the lathe. I finally enabled a slideshow feature on this website, this link will load up all of the additional images for each project. The first project is a lidded container made from maple and purpleheart. I misjudged the amount of maple I had to work with and really wanted a lid for this container. A bit of leftover purpleheart fixed that problem. The container is about 5 inches in diameter at the widest point and about 4 inches tall overall with the finial. The next project is a honduran rosewood classic profile yo-yo with gold plating. The finis is a coat of boiled linseed oil followed by a tripoli/white diamond/carnauba wax high speed buffing. This yo-yo has a sleeve bearing for good sleeping and is exceptionally well balanced. The next project is a Wall Street II profile ballpoint pen with twist mechanism. The wood is an Ebonized Madrone Burl, a pacific hardwood with rich dark textures. The next pen is a Tycoon style rollerball also dressed in Ebonized Madrone Burl. The Tycoon is simply a great looking pen.
Submitted by craig on Mon, 08/09/2010 - 1:30am.
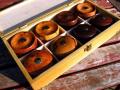
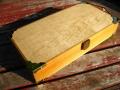
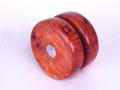
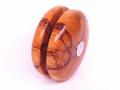
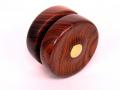
 Apart from the Nouveau Sceptre pen I made for Jen's birthday, I found time to work on a few other projects. First is a couple of copper plated slimline ballpoint pens. A friend of mine had taken down a tree recently and I thought it would be nice to make a couple of pens for her daughters who were quite attached to that tree (a tree named George). I'm not even certain what kind of tree this is, but it is rather soft and wooly. It does polish nicely, although somewhat lacking in character and grain distinction. I turned a bowl from it recently which is still aging nicely on my coffee table, so I expect these to hold together nicely. The second image is another Honduran Rosewood Yo Yo with Gold plated hardware. I am really liking the Honduran rosewood, it turns very easily and polishes effortlessly. It';s a very solid and dense wood, making this a weapons grade yo-yo at 99 grams. The third and fourth images are a case I created to keep and show yo-yos I have made and are available for purchase. I had some spare poplar and birch lying around, and this gave me an opportunity to try making a finger joint with the table saw. I finished the box with a light cherry stain and several coats of satin polyurethane. All accent pieces are brass. I still have some work to do on this.
Apart from the Nouveau Sceptre pen I made for Jen's birthday, I found time to work on a few other projects. First is a couple of copper plated slimline ballpoint pens. A friend of mine had taken down a tree recently and I thought it would be nice to make a couple of pens for her daughters who were quite attached to that tree (a tree named George). I'm not even certain what kind of tree this is, but it is rather soft and wooly. It does polish nicely, although somewhat lacking in character and grain distinction. I turned a bowl from it recently which is still aging nicely on my coffee table, so I expect these to hold together nicely. The second image is another Honduran Rosewood Yo Yo with Gold plated hardware. I am really liking the Honduran rosewood, it turns very easily and polishes effortlessly. It';s a very solid and dense wood, making this a weapons grade yo-yo at 99 grams. The third and fourth images are a case I created to keep and show yo-yos I have made and are available for purchase. I had some spare poplar and birch lying around, and this gave me an opportunity to try making a finger joint with the table saw. I finished the box with a light cherry stain and several coats of satin polyurethane. All accent pieces are brass. I still have some work to do on this.
Submitted by craig on Mon, 08/09/2010 - 12:26am.
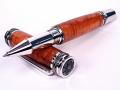
 Every year I try to make Jen a special pen for her birthday, usually one I have not made previously, or from a material that I have never used before. This year's birthday pen is a Nouveau Sceptre from Penn State Industries dressed in Charoite TruStone. First a word on the pen hardware: This is an Art Nouveau inspired design from David Broadwell (maker of very high end fountain pen designs) featuring Rhodium (Platinum Group) plated hardware kit with 2-micron 22Kt gold band, Schmidt Ceramic Point Roller Ball, and postable cap. The TruStone material is a pliable pen blank made from approximately 85% natural stone ore that is pigmented and combined with a gem resin. The resin, which is specially formulated for the pen turning industry, allows for higher heat tolerances so the blank is less susceptible to fractures or breakage when using standard woodturning tools. Combined, the pen weighs in at a heavy 69 grams, 34 grams in the cap alone. Those who prefer a lighter pen would not want to post the cap on this one. Being 85% stone ore, it wears down tools quickly. I can normally turn a wood profile in about 10 minutes, and an acrylic in about 20 minutes. This blank took about an hour to turn to profile, stopping to resharpen about every 10 minutes. I finished with sanding from 220 up to 12500 grit micro-mesh. There was no need for any additional polish after that, the TruStone developed a brilliant glow from the gem resin. I turned this pen on Saturday for Jen's birthday at the end of the month, but I could not contain my excitement and gifted it a bit early. The blank was one she pointed out about a year ago in Woodcraft. I picked it up shortly afterwards and tried to find a nice hardware kit to pair it with. I think the combined colors and stylizing make this an elegant writing instrument.
Every year I try to make Jen a special pen for her birthday, usually one I have not made previously, or from a material that I have never used before. This year's birthday pen is a Nouveau Sceptre from Penn State Industries dressed in Charoite TruStone. First a word on the pen hardware: This is an Art Nouveau inspired design from David Broadwell (maker of very high end fountain pen designs) featuring Rhodium (Platinum Group) plated hardware kit with 2-micron 22Kt gold band, Schmidt Ceramic Point Roller Ball, and postable cap. The TruStone material is a pliable pen blank made from approximately 85% natural stone ore that is pigmented and combined with a gem resin. The resin, which is specially formulated for the pen turning industry, allows for higher heat tolerances so the blank is less susceptible to fractures or breakage when using standard woodturning tools. Combined, the pen weighs in at a heavy 69 grams, 34 grams in the cap alone. Those who prefer a lighter pen would not want to post the cap on this one. Being 85% stone ore, it wears down tools quickly. I can normally turn a wood profile in about 10 minutes, and an acrylic in about 20 minutes. This blank took about an hour to turn to profile, stopping to resharpen about every 10 minutes. I finished with sanding from 220 up to 12500 grit micro-mesh. There was no need for any additional polish after that, the TruStone developed a brilliant glow from the gem resin. I turned this pen on Saturday for Jen's birthday at the end of the month, but I could not contain my excitement and gifted it a bit early. The blank was one she pointed out about a year ago in Woodcraft. I picked it up shortly afterwards and tried to find a nice hardware kit to pair it with. I think the combined colors and stylizing make this an elegant writing instrument.login to post comments
Submitted by craig on Mon, 07/26/2010 - 12:46am.
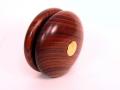
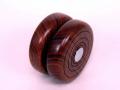
 Here are some miscellaneous turnings for Sunday, June 25th. It has been a while since I've felt like running the lathe, mostly due to high temperatures and humidity for the past few weeks. One day I'll have an environmentally controlled workshop. I started off turning a small bowl out of what I'll call "mystery wood". I had a friend borrow my chain saw to take down a dying tree, and I salvaged some of the wood from trunk. I'm not certain what species it was, and I am not good at identifying based on bark yet. It was a very 'woolly' wood. It had very bad tear out and took just as much time sanding as it did turning. The end result is a small dish/bowl, about 4.5" in diameter, and about 1.75" high. It is still a little green (wet), so I am not entirely sure if it will stay intact or develop a check at some point, we shall see. I also setup and turned two new Yo-Yos this afternoon. I purchased a nice (albeit expensive) piece of Honduran Rosewood recently. It's a very dense wood with striking knots and grain patterns. The two Yo-Yos both feature chrome plated hardware and steel sleeve bearings. Both are finished with a light coat of danish oil followed by high speed buffing with tripoli, white diamond and carnauba. The convex, or traditional style yo-yo weighs in at 94 grams and is 2 3/8" in diameter. The concave profile yo-yo weighs in at a whopping 109 grams and is 2 5/16" in diameter.
Here are some miscellaneous turnings for Sunday, June 25th. It has been a while since I've felt like running the lathe, mostly due to high temperatures and humidity for the past few weeks. One day I'll have an environmentally controlled workshop. I started off turning a small bowl out of what I'll call "mystery wood". I had a friend borrow my chain saw to take down a dying tree, and I salvaged some of the wood from trunk. I'm not certain what species it was, and I am not good at identifying based on bark yet. It was a very 'woolly' wood. It had very bad tear out and took just as much time sanding as it did turning. The end result is a small dish/bowl, about 4.5" in diameter, and about 1.75" high. It is still a little green (wet), so I am not entirely sure if it will stay intact or develop a check at some point, we shall see. I also setup and turned two new Yo-Yos this afternoon. I purchased a nice (albeit expensive) piece of Honduran Rosewood recently. It's a very dense wood with striking knots and grain patterns. The two Yo-Yos both feature chrome plated hardware and steel sleeve bearings. Both are finished with a light coat of danish oil followed by high speed buffing with tripoli, white diamond and carnauba. The convex, or traditional style yo-yo weighs in at 94 grams and is 2 3/8" in diameter. The concave profile yo-yo weighs in at a whopping 109 grams and is 2 5/16" in diameter.
Submitted by craig on Wed, 06/16/2010 - 12:44am.
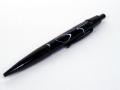
 And just like that, hot and humid weather hits Northwest Ohio. With proper fan setup, turning and other miscellaneous woodworking is still manageable. Here are some turnings I worked on this past weekend. From left to right, the first pen is a 2-way Tech pen style, allowing for two different cartridges to be loaded at once. BY twisting one way or the other, either cartridge is extended. The kit comes with black and red ballpoints, and a plastic stylus for PDAs or smartphones. The pen is plated in 24kt gold and outfitted in green burl acrylic. The acrylic is turned at low speeds and polished using micro mesh to 12k grit. This is actually a personal pen since I misplaced my original Tech pen a week ago. Whoever finds it will certainly have a nice pen to hold on to. The next few pens are a different style called Vertex. They are gunmetal plated and feature a ballpoint click mechanism. The cartridge is a Parker style refill and should accept gel writer cartridges as an alternative. The first of the Vertex pens is dressed in emerald acrylic and finished similar to the Tech pen.
And just like that, hot and humid weather hits Northwest Ohio. With proper fan setup, turning and other miscellaneous woodworking is still manageable. Here are some turnings I worked on this past weekend. From left to right, the first pen is a 2-way Tech pen style, allowing for two different cartridges to be loaded at once. BY twisting one way or the other, either cartridge is extended. The kit comes with black and red ballpoints, and a plastic stylus for PDAs or smartphones. The pen is plated in 24kt gold and outfitted in green burl acrylic. The acrylic is turned at low speeds and polished using micro mesh to 12k grit. This is actually a personal pen since I misplaced my original Tech pen a week ago. Whoever finds it will certainly have a nice pen to hold on to. The next few pens are a different style called Vertex. They are gunmetal plated and feature a ballpoint click mechanism. The cartridge is a Parker style refill and should accept gel writer cartridges as an alternative. The first of the Vertex pens is dressed in emerald acrylic and finished similar to the Tech pen.
Submitted by craig on Tue, 05/25/2010 - 1:32am.
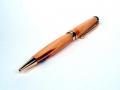
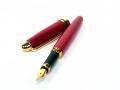
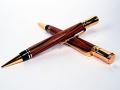
 Mid May has me back to turning pens for the first time since last year. I picked a mix of materials and a few new styles. From left to right, the first pen is a Wall Street II Elegant series with Black Titanium and Platinum hardware. The mechanism is a ballpoint twist with detail scroll work on the lower band. The material is acrylic "pitch black" wet sanded to 12000 grit micro mesh. The next pen is a Wall Street II black enamel finish. The mechanism is a click style ballpoint and it is dressed in the same acrylic. The next pen is a European profile fountain pen with gold plated fittings. The cap is screw on and non-postable. The material is Purpleheart, sanded to 600 grit with BLO/CA finish for high resiliency and gloss. The next pen is a European profile ballpoint twist with gold fittings. The material is American Applewood, sanded to 600 grit with BLO/CA finish also. This pen was a gift to a friend who provided me with almost a whole applewood tree he had taken down in his yard. The last pen is a Tycoon rollerball with Platinum plated hardware. The cap is screw on and postable and the pen is dressed in Lacewood. This was an Anniversary gift to my wife for our 13th.
Mid May has me back to turning pens for the first time since last year. I picked a mix of materials and a few new styles. From left to right, the first pen is a Wall Street II Elegant series with Black Titanium and Platinum hardware. The mechanism is a ballpoint twist with detail scroll work on the lower band. The material is acrylic "pitch black" wet sanded to 12000 grit micro mesh. The next pen is a Wall Street II black enamel finish. The mechanism is a click style ballpoint and it is dressed in the same acrylic. The next pen is a European profile fountain pen with gold plated fittings. The cap is screw on and non-postable. The material is Purpleheart, sanded to 600 grit with BLO/CA finish for high resiliency and gloss. The next pen is a European profile ballpoint twist with gold fittings. The material is American Applewood, sanded to 600 grit with BLO/CA finish also. This pen was a gift to a friend who provided me with almost a whole applewood tree he had taken down in his yard. The last pen is a Tycoon rollerball with Platinum plated hardware. The cap is screw on and postable and the pen is dressed in Lacewood. This was an Anniversary gift to my wife for our 13th.
Submitted by craig on Sun, 05/02/2010 - 10:41pm.
 While my garage may not be the best insulated, the roof does hold out the rain. So the on and off showers we has this weekend did not prevent me from getting a little lathe time in. I had three yo yo kits purchased last year, and a plank of Bolivian Rosewood, so I tried a few different designs, each producing different weight yo yos from 88 to 77 grams. I also turned out a few applewood tops, since they are both fun and easy to turn. All of the yo yos are listed on my Etsy account for sale.
While my garage may not be the best insulated, the roof does hold out the rain. So the on and off showers we has this weekend did not prevent me from getting a little lathe time in. I had three yo yo kits purchased last year, and a plank of Bolivian Rosewood, so I tried a few different designs, each producing different weight yo yos from 88 to 77 grams. I also turned out a few applewood tops, since they are both fun and easy to turn. All of the yo yos are listed on my Etsy account for sale.login to post comments
Submitted by craig on Sat, 04/03/2010 - 9:06pm.
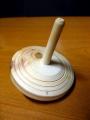
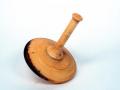
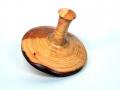
 The weather has warmed significantly over the past week, and with no major obligations, besides Easter with the family on Sunday, I opened the workshop and cleaned things up pretty thoroughly on Thursday. This allowed me to promptly cover the garage floor in wood shavings and sawdust again. I worked on a variety of projects over the past couple of days. The first was to fire up the lathe and try a few techniques with the spindle gouge and skew that I read about over the winter. I had some black walnut cut down for making Chinese Hat Boxes, but never got around to it before the weather turned cold last year. I should have sealed the ends to keep it from checking, but it seemed to take the temperature changes pretty well. I turned one of these as a present last year and wanted to make one for Jen. The finished project (pic, pic) is approximately 6 inches high and 4 inches in diameter at the widest point. The finish is Danish oil followed by a high speed buffing. While I had the lathe up and running, I chucked a small piece of Applewood and made a small spinning top. Nothing terribly special about this (pic, pic, pic) but it did give me a chance to try some new techniques with the spindle gouge.
The weather has warmed significantly over the past week, and with no major obligations, besides Easter with the family on Sunday, I opened the workshop and cleaned things up pretty thoroughly on Thursday. This allowed me to promptly cover the garage floor in wood shavings and sawdust again. I worked on a variety of projects over the past couple of days. The first was to fire up the lathe and try a few techniques with the spindle gouge and skew that I read about over the winter. I had some black walnut cut down for making Chinese Hat Boxes, but never got around to it before the weather turned cold last year. I should have sealed the ends to keep it from checking, but it seemed to take the temperature changes pretty well. I turned one of these as a present last year and wanted to make one for Jen. The finished project (pic, pic) is approximately 6 inches high and 4 inches in diameter at the widest point. The finish is Danish oil followed by a high speed buffing. While I had the lathe up and running, I chucked a small piece of Applewood and made a small spinning top. Nothing terribly special about this (pic, pic, pic) but it did give me a chance to try some new techniques with the spindle gouge.
Submitted by craig on Sat, 10/24/2009 - 11:40pm.
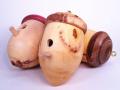
 Autumn is upon us, bring cooler temperatures and vibrant colors to Northwest Ohio. I only have a month or so of "good" weather before it will be time to pack up the garage for the winter, so I am trying to make the most of it. Being completely preoccupied with putting an Amateur Radio antenna tower in last weekend, and shorter daylight hours has cut back on the amount of time I've spent woodworking. Today was all mine though. From left to right, the first is a set or pens I am donating to the "Turn for the Troops" project. I have a set of five pens to donate this year, which is a small token of thanks for the efforts our armed services put forth. The pens are both slimline ballpoint twist mechanisms with Gunmetal plating and dressed in Padauk. The next image is of a ballpoint pen and pencil set in Kingwood. The plating is black enamel matte finish. The pen is a twist mechanism while the pencil is a click style. The stlye is called "comfort" since the body is slightly wider then the typical slimline, and features a rubber grip near the nib. The last image is a set of holiday ornaments I've been working on. If you can't tell, the are acorn style mini bird houses. Never intended to be used for that purpose though as they are only around 4 inches high and 1-2 inches in diameter.
Autumn is upon us, bring cooler temperatures and vibrant colors to Northwest Ohio. I only have a month or so of "good" weather before it will be time to pack up the garage for the winter, so I am trying to make the most of it. Being completely preoccupied with putting an Amateur Radio antenna tower in last weekend, and shorter daylight hours has cut back on the amount of time I've spent woodworking. Today was all mine though. From left to right, the first is a set or pens I am donating to the "Turn for the Troops" project. I have a set of five pens to donate this year, which is a small token of thanks for the efforts our armed services put forth. The pens are both slimline ballpoint twist mechanisms with Gunmetal plating and dressed in Padauk. The next image is of a ballpoint pen and pencil set in Kingwood. The plating is black enamel matte finish. The pen is a twist mechanism while the pencil is a click style. The stlye is called "comfort" since the body is slightly wider then the typical slimline, and features a rubber grip near the nib. The last image is a set of holiday ornaments I've been working on. If you can't tell, the are acorn style mini bird houses. Never intended to be used for that purpose though as they are only around 4 inches high and 1-2 inches in diameter.
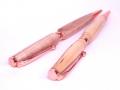
Submitted by craig on Mon, 10/05/2009 - 12:24am.
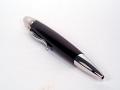
 After being knocked senseless for over a week by the cold from hell (I'm blaming my office co-workers), I finally had a weekend where I did not have any major scheduled events and I felt healthy to play out in the shop. I have a few new kits I've been wanting to try lately, and one special project I needed to get done this weekend. The pens from left to right include: A Slimline Pro gel-writer pen and pencil set dressed in Redheart. The metal finish is silver satin and the mechanism for both instruments is a click style. The Slimline Pro design is similar to the standard slimline with a slightly wider body and clean straight line design in the clip. The wider body allows for a gel-writer cartridge versus standard ballpoint. The pencil features a .7mm mechanism with an eraser behind the click cap. The finish is BLO/CA with high speed three wheel buffing. The second pen was a request from my wife. She wanted a turned pen small enough to fir comfortably in her pocket. There are several different kits available in a shortened format, I opted to try the Credit Card Ballpoint style.
After being knocked senseless for over a week by the cold from hell (I'm blaming my office co-workers), I finally had a weekend where I did not have any major scheduled events and I felt healthy to play out in the shop. I have a few new kits I've been wanting to try lately, and one special project I needed to get done this weekend. The pens from left to right include: A Slimline Pro gel-writer pen and pencil set dressed in Redheart. The metal finish is silver satin and the mechanism for both instruments is a click style. The Slimline Pro design is similar to the standard slimline with a slightly wider body and clean straight line design in the clip. The wider body allows for a gel-writer cartridge versus standard ballpoint. The pencil features a .7mm mechanism with an eraser behind the click cap. The finish is BLO/CA with high speed three wheel buffing. The second pen was a request from my wife. She wanted a turned pen small enough to fir comfortably in her pocket. There are several different kits available in a shortened format, I opted to try the Credit Card Ballpoint style.
Submitted by craig on Sat, 09/05/2009 - 10:52pm.
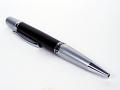
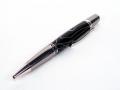
 Here are a few turnings from Labor Day weekend. From left to right, The first is an Atlas/Polaris style ballpoint twist pen with platinum plated hardware and Ebony dressing. The second pen is a Wall Street II Stain/Chrome plated ballpoint twist pen also with Ebony. The Ebony actually has quite a bit of depth to it, but it's very subtle and my light box setup tends to drown out the hints of brown grain that run through it. The next is a pen and pencil set. The style is called Executive and the hardware is 24k gold plated. Th e wood is called Tamboti, a South African hardwood with distinctive dark veining. Both pen and pencil are twist mechanisms. The last set is a Comfort Style black enamel plated twist ballpoint pen and click pencil set. The wood is Argentina Osage which polishes to a very nice glow.
Here are a few turnings from Labor Day weekend. From left to right, The first is an Atlas/Polaris style ballpoint twist pen with platinum plated hardware and Ebony dressing. The second pen is a Wall Street II Stain/Chrome plated ballpoint twist pen also with Ebony. The Ebony actually has quite a bit of depth to it, but it's very subtle and my light box setup tends to drown out the hints of brown grain that run through it. The next is a pen and pencil set. The style is called Executive and the hardware is 24k gold plated. Th e wood is called Tamboti, a South African hardwood with distinctive dark veining. Both pen and pencil are twist mechanisms. The last set is a Comfort Style black enamel plated twist ballpoint pen and click pencil set. The wood is Argentina Osage which polishes to a very nice glow. login to post comments
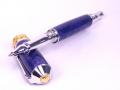
Submitted by craig on Sun, 08/30/2009 - 11:55pm.
 I have turned lots of pens in the past few years, some of which are promptly confiscated by my wife for her collection. It's all good though, I'm always delighted that I can make something that she will like and get some use out of. This year I decided to try a high end kit for her birthday. The kit I went with was a Majestic Black Titanium rollerball dressed in a stabilized non-dyed buckeye burl. The buckeye burl was 7/8 inches square and that did not leave a whole lot of room for errors. Being a stabilized blank, it turned a lot like a typical acrylic, which also meant I could finish it using micro-mesh. Some of the features of the pen are: A rhodium-plated clip that includes a sparkling Swarovski clear crystal; All exposed accent rings, bands and caps include elegant custom hand-carved 3 dimensional designs; Components are cast, polished then plated with extremely durable Black Titanium plating. The rollerball assembly includes a rhodium-plated pen nib with a premium Schmidt steel cartridge refill with a ceramic point. This is a massive pen. The overall length with cap is 6 inches, 5 inches with the cap removed. The width of the pen itself is about 5/8 inch with the cap at a very large 3/4 inch. The cap is non-postable, but that works out pretty well given the total weight of the pen.
I have turned lots of pens in the past few years, some of which are promptly confiscated by my wife for her collection. It's all good though, I'm always delighted that I can make something that she will like and get some use out of. This year I decided to try a high end kit for her birthday. The kit I went with was a Majestic Black Titanium rollerball dressed in a stabilized non-dyed buckeye burl. The buckeye burl was 7/8 inches square and that did not leave a whole lot of room for errors. Being a stabilized blank, it turned a lot like a typical acrylic, which also meant I could finish it using micro-mesh. Some of the features of the pen are: A rhodium-plated clip that includes a sparkling Swarovski clear crystal; All exposed accent rings, bands and caps include elegant custom hand-carved 3 dimensional designs; Components are cast, polished then plated with extremely durable Black Titanium plating. The rollerball assembly includes a rhodium-plated pen nib with a premium Schmidt steel cartridge refill with a ceramic point. This is a massive pen. The overall length with cap is 6 inches, 5 inches with the cap removed. The width of the pen itself is about 5/8 inch with the cap at a very large 3/4 inch. The cap is non-postable, but that works out pretty well given the total weight of the pen.
Submitted by craig on Sun, 08/30/2009 - 10:45pm.

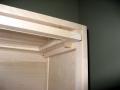
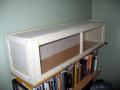
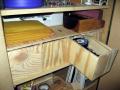
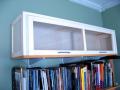 After consolidating our home offices, I wanted to have a cabinet I could keep personal treasures in. I wanted to not only display items and woodworking projects, I also did not want to have to dust them. Since we have a rabbit, fur tends to get on everything, and living out in the country does not help either. I considered a couple of different designs like swing out doors, and sliding glass doors, but ultimately decided on a barrister-style hinged door. The base for the project was a standard multi-position, heavy duty shelf system bolted right to the wall studs. I decided to build off of one of the 48in x 12in shelves. The material for the build was 3/4in aspen planks and 1/4in clear birch plywood. Aspen provides a nice clean face, cleaner then most pine on the market, it's cheaply priced, but requires a heck of a lot of post cleanup. It's not only a soft wood, but also very "wooly". Most of the joinery is routed tongue and groove, and the front door is fitted with some salvaged plexiglass temporarily (until I get single pane glass cut at the local hardware store). The pictures listed are obviously raw/unfinished wood. I am going to try to stain to match the laminated base which is American Cherry.
After consolidating our home offices, I wanted to have a cabinet I could keep personal treasures in. I wanted to not only display items and woodworking projects, I also did not want to have to dust them. Since we have a rabbit, fur tends to get on everything, and living out in the country does not help either. I considered a couple of different designs like swing out doors, and sliding glass doors, but ultimately decided on a barrister-style hinged door. The base for the project was a standard multi-position, heavy duty shelf system bolted right to the wall studs. I decided to build off of one of the 48in x 12in shelves. The material for the build was 3/4in aspen planks and 1/4in clear birch plywood. Aspen provides a nice clean face, cleaner then most pine on the market, it's cheaply priced, but requires a heck of a lot of post cleanup. It's not only a soft wood, but also very "wooly". Most of the joinery is routed tongue and groove, and the front door is fitted with some salvaged plexiglass temporarily (until I get single pane glass cut at the local hardware store). The pictures listed are obviously raw/unfinished wood. I am going to try to stain to match the laminated base which is American Cherry.
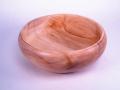
Submitted by craig on Mon, 08/24/2009 - 2:40am.
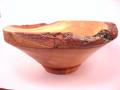
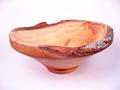 So what does one do with a chunk of dried common maple already starting to check? You get in some bowl turning practice. The chunk of maple had some very nice bark still in tact, so I though it would be nice to preserve some on the rim as much as possible. I made a small cove near the bottom as well which was really a "design opportunity". The height is approximately 4.5 inches and the outer diameter around 7 inches. The finish is a Danish Oil followed by a high speed buffing with tripoli and white diamond. Turning speed was fairly slow, only around 500 rpm. Total time around 6 hours to complete.
So what does one do with a chunk of dried common maple already starting to check? You get in some bowl turning practice. The chunk of maple had some very nice bark still in tact, so I though it would be nice to preserve some on the rim as much as possible. I made a small cove near the bottom as well which was really a "design opportunity". The height is approximately 4.5 inches and the outer diameter around 7 inches. The finish is a Danish Oil followed by a high speed buffing with tripoli and white diamond. Turning speed was fairly slow, only around 500 rpm. Total time around 6 hours to complete. login to post comments
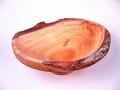
Submitted by craig on Sun, 08/16/2009 - 10:57pm.

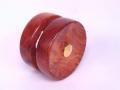
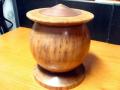
 Summer has finally arrived in Northwest Ohio. We have seen humidity and temps on the rise for the past couple of weeks, and this weekend was no exception. I can do a little woodworking in short bursts, before it gets a bit too miserable to stand in the garage in 90+ degree heat. I started a small turning a week ago from a chunk of maple a co-worker gave me last year. Never having turned common maple, I did not know what to expect. This particular species is a bit more loose grained with a tendency to splinter quite easily. I spent 20 minutes sharpening and honing my skews, any sharper and they probably would have cut a hole into a separate reality (see Philip Pullman's The Subtle Knife), but it still fought being turned every step. Thank goodness for sandpaper. Even after buffing, it still has some flaws from tear-out. But then (as the website says) flaws add character, and this one has a whole lot of character. The cannister pictured is about 4 inches in diameter, and about 5 inches high.
Among other accomplishments from this weekend include installing a Comet GP-6 dual-band VHF/UHF external antenna. I am using this with my Yaesu VX-7R, which is only a 5 watt radio, but still can drive a signal west to Bryan, OH, and East to Oregon, OH. Finally having an external antenna is a good thing!
Summer has finally arrived in Northwest Ohio. We have seen humidity and temps on the rise for the past couple of weeks, and this weekend was no exception. I can do a little woodworking in short bursts, before it gets a bit too miserable to stand in the garage in 90+ degree heat. I started a small turning a week ago from a chunk of maple a co-worker gave me last year. Never having turned common maple, I did not know what to expect. This particular species is a bit more loose grained with a tendency to splinter quite easily. I spent 20 minutes sharpening and honing my skews, any sharper and they probably would have cut a hole into a separate reality (see Philip Pullman's The Subtle Knife), but it still fought being turned every step. Thank goodness for sandpaper. Even after buffing, it still has some flaws from tear-out. But then (as the website says) flaws add character, and this one has a whole lot of character. The cannister pictured is about 4 inches in diameter, and about 5 inches high.
Among other accomplishments from this weekend include installing a Comet GP-6 dual-band VHF/UHF external antenna. I am using this with my Yaesu VX-7R, which is only a 5 watt radio, but still can drive a signal west to Bryan, OH, and East to Oregon, OH. Finally having an external antenna is a good thing!
login to post comments