Submitted by craig on Mon, 08/03/2009 - 1:24am.
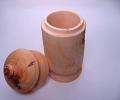
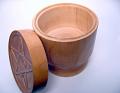
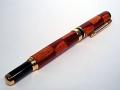
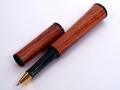
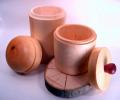
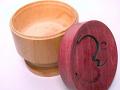 Here are some examples of practice work I've been doing with turned lidded containers. Most of the work involves raw lumber, some of which is still a bit green, but it's only practice anyhow, right? From left to right, we have a Japanese Cherry tree trunk which had a matching lid. As I previously stated, I turned green wood which can have some unexpected results. In this case, the lid split on the edge after about 24 hours and was non repairable. I salvaged the container by using some purpleheart stock I had lying around. I then bevel cut a silhouette to add a little character. The container is about 3.5 inches in diameter and about 3 inches high. The finish is boiled linseed oil with a high speed buffing. The next container is also Japanese Cherry, but the lid stayed intact for this one. I also did a bit of scroll saw work on this lid, relief cutting a simple pentagram. The finish technique and dimensions are similar to the other Japanese Cherry container. The last container is an applewood species (exact species is unknown) and still has a bit of the bark on a small portion. The finish is a coat of Danish Oil and it measures around 2 inches in diameter and about 5 inches high.
Here are some examples of practice work I've been doing with turned lidded containers. Most of the work involves raw lumber, some of which is still a bit green, but it's only practice anyhow, right? From left to right, we have a Japanese Cherry tree trunk which had a matching lid. As I previously stated, I turned green wood which can have some unexpected results. In this case, the lid split on the edge after about 24 hours and was non repairable. I salvaged the container by using some purpleheart stock I had lying around. I then bevel cut a silhouette to add a little character. The container is about 3.5 inches in diameter and about 3 inches high. The finish is boiled linseed oil with a high speed buffing. The next container is also Japanese Cherry, but the lid stayed intact for this one. I also did a bit of scroll saw work on this lid, relief cutting a simple pentagram. The finish technique and dimensions are similar to the other Japanese Cherry container. The last container is an applewood species (exact species is unknown) and still has a bit of the bark on a small portion. The finish is a coat of Danish Oil and it measures around 2 inches in diameter and about 5 inches high.login to post comments
Submitted by craig on Sun, 07/19/2009 - 10:21pm.
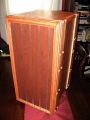
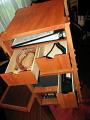
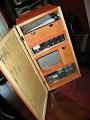 This project started out a few weeks ago after I acquired my Kenwood HF Transceiver. With an HF rig, you not only have the radio itself, but usually an external power supply, and more then often, an antenna tuner. I have a small desk to put all of this gear on, and rather then have it scattered around "unorganized", I figured I would build a shelf to contain it all. I wanted to keep it low cost by reusing as much scrap wood and materials that I had in the garage. I also thought this would be a good exercise in some basic carcase construction, as well as cabinet building skills. The problem with a cabinet is that tend to not be very well ventilated, and that could prove to be a problem if I want to operate the rig for more then an hour. I decided to make a hybrid instead. The cabinet sides are a wainscoting material that slides in groves which have been routed in the shelf supports. This makes the sides and back very easy to slide out to provide better ventilation and access for extended operating. The front is an attempt at a cabinet door. The stiles and rails are oak that I routed using a cabinet making bit set I've had for a few years now. I made an adjustment to the hinges by popping the manufacturer installed pins and using a length of coat hanger wire which allows me to take the entire door off. Other features include three drawers for parts and a shelf for operating manuals. I have two other wish list items for this project: a heavy duty collapsible tripod for field use, and a heavy duty luggage style handle for the top.
This project started out a few weeks ago after I acquired my Kenwood HF Transceiver. With an HF rig, you not only have the radio itself, but usually an external power supply, and more then often, an antenna tuner. I have a small desk to put all of this gear on, and rather then have it scattered around "unorganized", I figured I would build a shelf to contain it all. I wanted to keep it low cost by reusing as much scrap wood and materials that I had in the garage. I also thought this would be a good exercise in some basic carcase construction, as well as cabinet building skills. The problem with a cabinet is that tend to not be very well ventilated, and that could prove to be a problem if I want to operate the rig for more then an hour. I decided to make a hybrid instead. The cabinet sides are a wainscoting material that slides in groves which have been routed in the shelf supports. This makes the sides and back very easy to slide out to provide better ventilation and access for extended operating. The front is an attempt at a cabinet door. The stiles and rails are oak that I routed using a cabinet making bit set I've had for a few years now. I made an adjustment to the hinges by popping the manufacturer installed pins and using a length of coat hanger wire which allows me to take the entire door off. Other features include three drawers for parts and a shelf for operating manuals. I have two other wish list items for this project: a heavy duty collapsible tripod for field use, and a heavy duty luggage style handle for the top.
Submitted by craig on Tue, 07/07/2009 - 11:52pm.
I had to post this.,,thanks to my brother in Florida for sending this my way,,,
COMMON TOOLS DEFINED
DRILL PRESS: A tall upright machine useful for suddenly snatching flat metal bar stock out of your hands so that it smacks you in the chest and flings your beer across the room, denting the freshly-painted vertical stabilizer which you had carefully set in the corner where nothing could get to it.
WIRE WHEEL: Cleans paint off bolts and then throws them somewhere under the workbench with the speed of light. Also removes fingerprints and hard-earned calluses from fingers in about the time it takes you to say, "Oh sh!#..."
SKILL SAW: A portable cutting tool used to make wood studs too short.
PLIERS: Used to round off bolt heads. Sometimes used in the creation of blood-blisters.
BELT SANDER: An electric sanding tool commonly used to convert minor touch-up jobs into major refinishing jobs.
HACKSAW: One of a family of cutting tools built on the Ouija board principle. It transforms human energy into a crooked, unpredictable motion, and the more you attempt to influence its course, the more dismal your future becomes.
VISE-GRIPS: Generally used after pliers to completely round off bolt heads. If nothing else is available, they can also be used to transfer intense welding heat to the palm of your hand.
WELDING GLOVES: Heavy duty leather gloves used to prolong the conduction of intense welding heat to the palm of your hand.
OXYACETYLENE TORCH: Used almost entirely for lighting various flammable objects in your shop on fire. Also handy for igniting the grease inside the wheel hub out of which you want to remove a bearing race.
TABLE SAW: A large stationary power tool commonly used to launch wood projectiles for testing wall integrity.
Submitted by craig on Mon, 06/15/2009 - 12:58am.
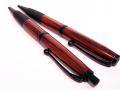
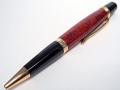
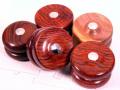
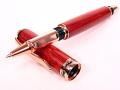 It's been well over a month since I've had opportunity to spin up the lathe, mostly due to full schedules on the weekend, home renovation, laziness, etc. I finally decided to turn a couple of new kits I've had collecting dust since Christmas. The first kit is a copper Sedona roller-ball dressed in Padauk. The kit has exceptional weight, decorative center band, and a post-able cap. The second set is a "comfort grip" variation of the slim-line 7mm pen kit dressed in Bolivian Rosewood. The two major differences are the rubber grip insert at the front of the lower barrel, and a considerably wider diameter center band. This creates a thicker pen then the traditional slim-line, but since the wood is removed for the grip, the weight of the pen is still reasonable. The pen mechanism is a standard ballpoint twist, while the .5mm pencil uses a click mechanism with an erasure under the top cap. The finish is matte black enamel.
It's been well over a month since I've had opportunity to spin up the lathe, mostly due to full schedules on the weekend, home renovation, laziness, etc. I finally decided to turn a couple of new kits I've had collecting dust since Christmas. The first kit is a copper Sedona roller-ball dressed in Padauk. The kit has exceptional weight, decorative center band, and a post-able cap. The second set is a "comfort grip" variation of the slim-line 7mm pen kit dressed in Bolivian Rosewood. The two major differences are the rubber grip insert at the front of the lower barrel, and a considerably wider diameter center band. This creates a thicker pen then the traditional slim-line, but since the wood is removed for the grip, the weight of the pen is still reasonable. The pen mechanism is a standard ballpoint twist, while the .5mm pencil uses a click mechanism with an erasure under the top cap. The finish is matte black enamel. login to post comments
Submitted by craig on Wed, 05/27/2009 - 11:01pm.


 After nine years of learning to ignore the hideous linoleum flooring in our kitchen, the time came to tear it out and start fresh. The recent Memorial day weekend (coupled with a couple of vacation days) gave us the time to see this project through. We started Friday by ripping out about 75% of the old linoleum (which actually turned out to be two layers of linoleum) along with the hardboard substrate which seemed to have a nail every square inch holding it to the floor boards. With that accomplished, we borrowed the company truck and acquired the new laminate flooring and plywood before returning home. Saturday had us finishing the demolition down to the floorboards, leveling the subfloor, and the install of the plywood underlayment. Sunday we did a bit more prep work on the door casings then started installing the laminate. We got about 50% of the floor covered before calling it a day. The project was finished on Monday with the installation of the remaining flooring and trim work. I must say I am pleased with the end result:


 After nine years of learning to ignore the hideous linoleum flooring in our kitchen, the time came to tear it out and start fresh. The recent Memorial day weekend (coupled with a couple of vacation days) gave us the time to see this project through. We started Friday by ripping out about 75% of the old linoleum (which actually turned out to be two layers of linoleum) along with the hardboard substrate which seemed to have a nail every square inch holding it to the floor boards. With that accomplished, we borrowed the company truck and acquired the new laminate flooring and plywood before returning home. Saturday had us finishing the demolition down to the floorboards, leveling the subfloor, and the install of the plywood underlayment. Sunday we did a bit more prep work on the door casings then started installing the laminate. We got about 50% of the floor covered before calling it a day. The project was finished on Monday with the installation of the remaining flooring and trim work. I must say I am pleased with the end result:
login to post comments
Submitted by craig on Mon, 04/27/2009 - 2:03am.
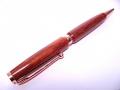
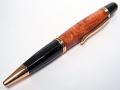
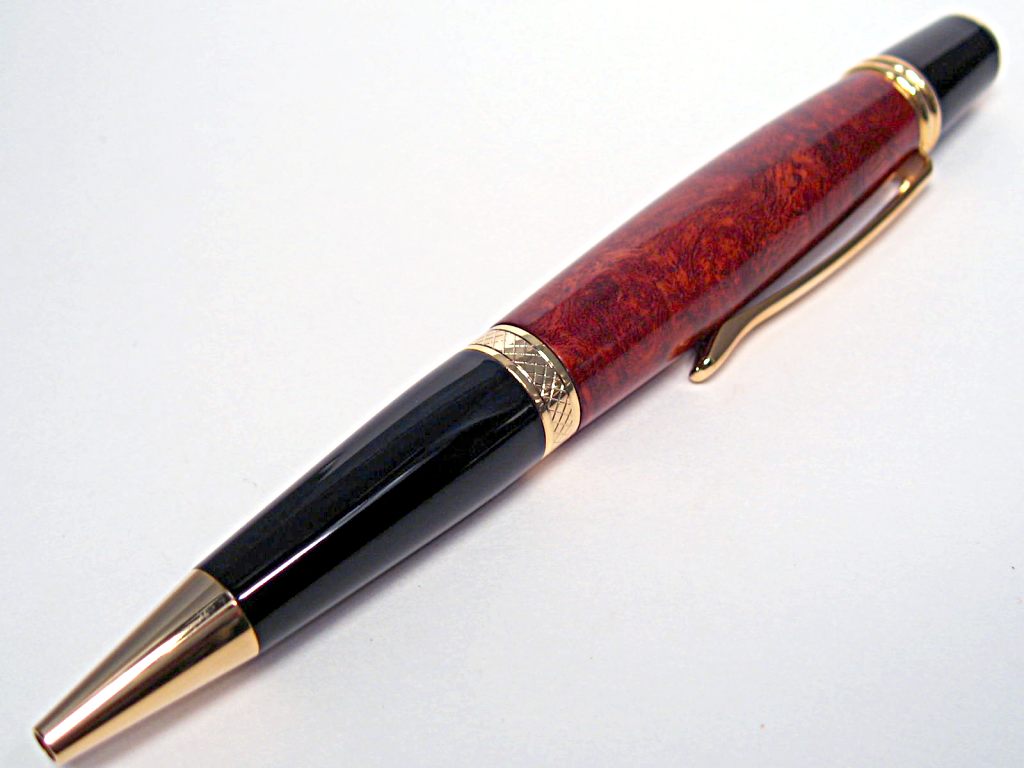
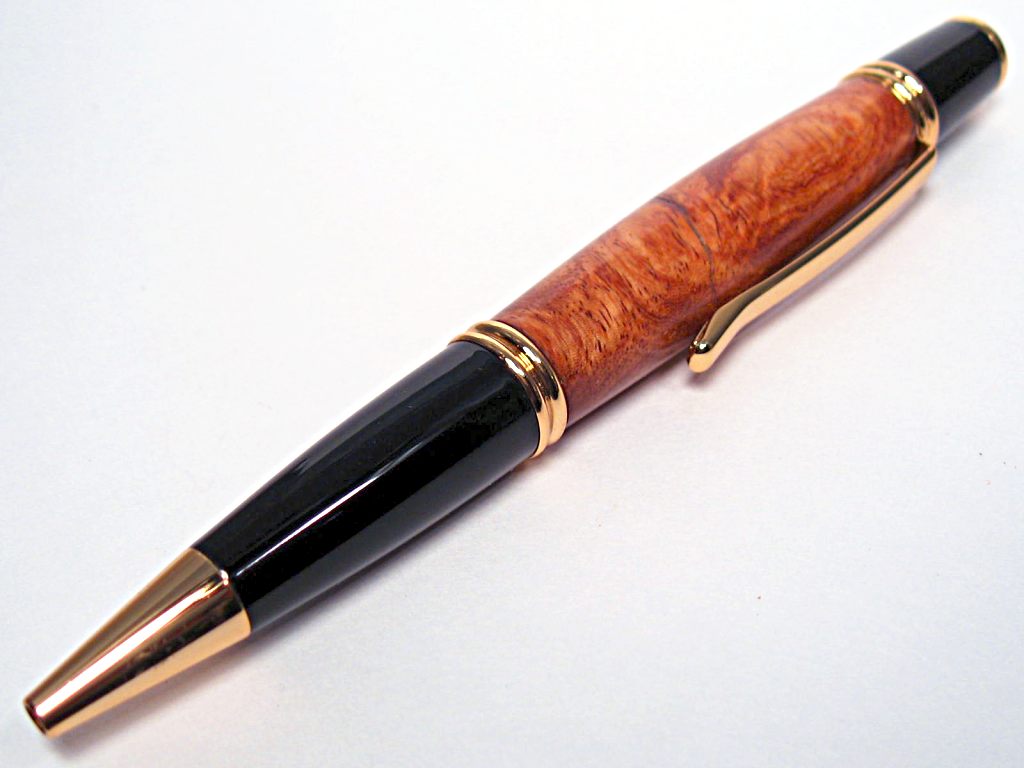
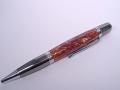
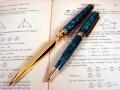
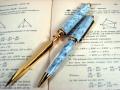
 With temperatures in the 80's this weekend, I had more then enough time to work on a few lathe projects this weekend. I had a few more then four projects planned and prepped, but got very distracted cleaning up my garage this afternoon. I spent a few hours cleaning up the back portion of the garage which yielded about sixteen square feet of usable space that was previously covered by lawn and garden equipment. On to the projects: The first pen is a European style ballpoint with gold plated fittings, dressed in Spalted Pecan. The finish is sanding to 600 grit, followed by a coat of Danish oil and CA, finished with a high speed buffing with Carnauba Wax. The spalting in the wood helps accentuate the grain lines to produce very crisp lines with a rich coloring. The next pen is a Classic American Fountain pen with Gold plated hardware and dressed in Bethlehem Olive Wood. These blanks usually take me a few months to get once I order them, as quantities are limited. Olive wood is heavy, dense and durable with a distinctive colors that range in nuances of red and creamy pigments with irregular gray, brown, and wild black lines. The next pen is a Slimline style ballpoint pen with copper plated fittings and dressed in Kingwood. The last is another Slimline style ballpoint pen with gunmetal plated fittings and dressed in Curly Maple.
With temperatures in the 80's this weekend, I had more then enough time to work on a few lathe projects this weekend. I had a few more then four projects planned and prepped, but got very distracted cleaning up my garage this afternoon. I spent a few hours cleaning up the back portion of the garage which yielded about sixteen square feet of usable space that was previously covered by lawn and garden equipment. On to the projects: The first pen is a European style ballpoint with gold plated fittings, dressed in Spalted Pecan. The finish is sanding to 600 grit, followed by a coat of Danish oil and CA, finished with a high speed buffing with Carnauba Wax. The spalting in the wood helps accentuate the grain lines to produce very crisp lines with a rich coloring. The next pen is a Classic American Fountain pen with Gold plated hardware and dressed in Bethlehem Olive Wood. These blanks usually take me a few months to get once I order them, as quantities are limited. Olive wood is heavy, dense and durable with a distinctive colors that range in nuances of red and creamy pigments with irregular gray, brown, and wild black lines. The next pen is a Slimline style ballpoint pen with copper plated fittings and dressed in Kingwood. The last is another Slimline style ballpoint pen with gunmetal plated fittings and dressed in Curly Maple.
Submitted by craig on Sun, 04/19/2009 - 12:04am.
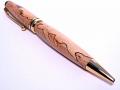
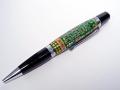
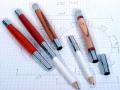
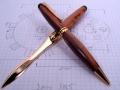
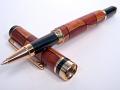 A few weeks ago, I made a couple of Segmented Pen Blanks, the first of which I turned last weekend, a fountain pen kit with walnut and oak stock, glued up with red veneer. When making a blank of that style, there is usually a second blank for turning also. This blank was glued up in the same style, but using a black veneer between the pieces. I also opted to use a roller-ball mechanism instead of a fountain pen. The blanks were turned and sanded to 600 grit, then received three coats of CA, followed by a high speed buff and wax. The second pen is an Atlas style twist pencil with satin silver finish and dressed in a Fire and Ice Acrylic. The blank was sanded with micro-mesh to 12,000 grit and poilshed with HUT plastic polish. The other two pens were "rehabs" from some turnings last year. I was never quite satisfied with the finish on either of them, so I lightly returned the blanks and refinished using the CA and high speed buffing technique. The first is a Maple Burl and the second is an Amboyna Burl. Both are Gatsby/Wallstreet Ballpoint twist pens.
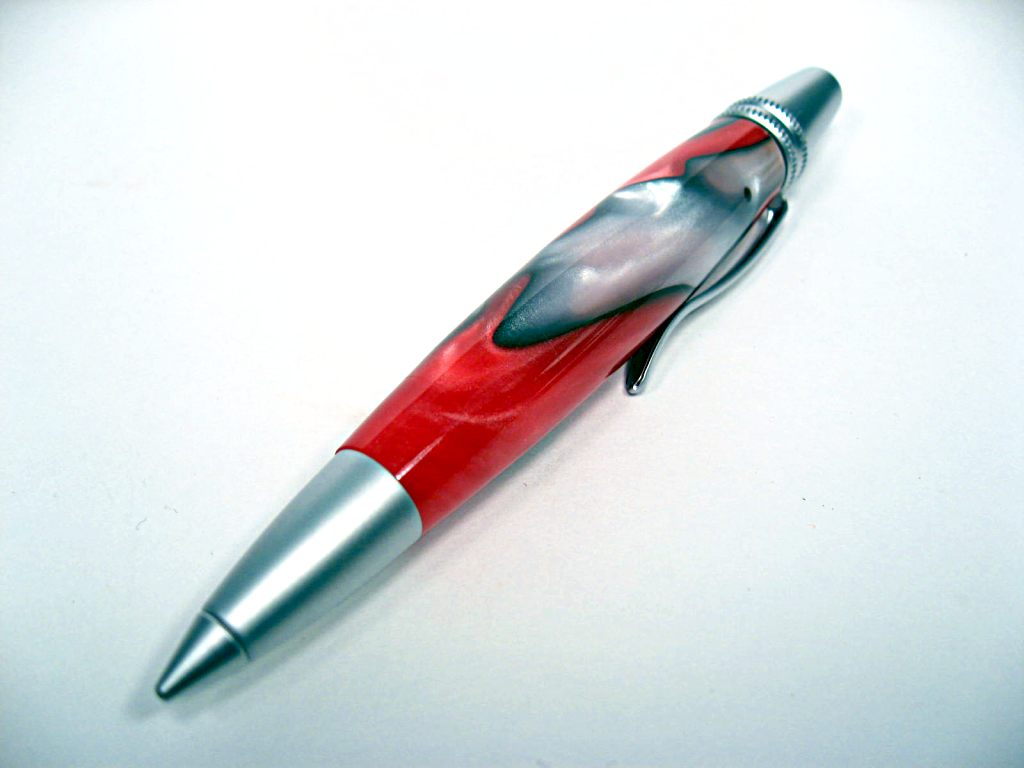
 A few weeks ago, I made a couple of Segmented Pen Blanks, the first of which I turned last weekend, a fountain pen kit with walnut and oak stock, glued up with red veneer. When making a blank of that style, there is usually a second blank for turning also. This blank was glued up in the same style, but using a black veneer between the pieces. I also opted to use a roller-ball mechanism instead of a fountain pen. The blanks were turned and sanded to 600 grit, then received three coats of CA, followed by a high speed buff and wax. The second pen is an Atlas style twist pencil with satin silver finish and dressed in a Fire and Ice Acrylic. The blank was sanded with micro-mesh to 12,000 grit and poilshed with HUT plastic polish. The other two pens were "rehabs" from some turnings last year. I was never quite satisfied with the finish on either of them, so I lightly returned the blanks and refinished using the CA and high speed buffing technique. The first is a Maple Burl and the second is an Amboyna Burl. Both are Gatsby/Wallstreet Ballpoint twist pens.
login to post comments
Submitted by craig on Tue, 04/14/2009 - 12:05am.
 This year I want to focus on segmented turnings. While they take a considerable amount of time and patience to not only setup the blanks, but to turn them to size, the results are well worth it. I thought it would be helpful to create a page on the techniques I am currently using to create pens like these. This page will focus on a checkerboard style layout. In this case, a checkboard with a bit of a warp.
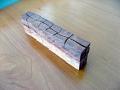 Step 1: Initial Cuts. To start, I like to have a contrasting color scheme. For this pen, I used a walnut and oak combination. The blanks should of similar dimensions which will help when gluing them together later on. Use double sided woodworking tape to hold the blanks together while running them through the bandsaw. I made a wavy cut down the long axis, then cross cuts which will be swapped around. Reassemble the blank on a tape (dry, do not glue) to keep the order of pieces straight.
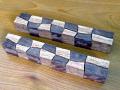 Step 2: Arrange blanks for gluing. take the two cut blanks and separate them from the double sided tape. Swap every other piece from both blanks to create a checkerboard style layout. The fit should be tight if the bandsaw blade did not drift much. At this point I could glue up the blanks as is, but I decided to cut strips of dyed maple veneer and glue that up with the pieces. I used black and red dyed veneers to produce a little variety.
This year I want to focus on segmented turnings. While they take a considerable amount of time and patience to not only setup the blanks, but to turn them to size, the results are well worth it. I thought it would be helpful to create a page on the techniques I am currently using to create pens like these. This page will focus on a checkerboard style layout. In this case, a checkboard with a bit of a warp.
Step 1: Initial Cuts. To start, I like to have a contrasting color scheme. For this pen, I used a walnut and oak combination. The blanks should of similar dimensions which will help when gluing them together later on. Use double sided woodworking tape to hold the blanks together while running them through the bandsaw. I made a wavy cut down the long axis, then cross cuts which will be swapped around. Reassemble the blank on a tape (dry, do not glue) to keep the order of pieces straight.
Step 2: Arrange blanks for gluing. take the two cut blanks and separate them from the double sided tape. Swap every other piece from both blanks to create a checkerboard style layout. The fit should be tight if the bandsaw blade did not drift much. At this point I could glue up the blanks as is, but I decided to cut strips of dyed maple veneer and glue that up with the pieces. I used black and red dyed veneers to produce a little variety.
Submitted by craig on Sun, 04/05/2009 - 3:05am.

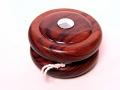
 All the right conditions fell into place: a very nice spring day, no planned activities or commitments, a couple of acrylic blanks needing to be turned since December...Today was a great day in the workshop. I turned three pens, a couple of yo-yos, and started a real cool (hopefully) segmented blank (that one is going to require a lot of glue...and clamps...lots of clamps). So, from left to right in the images, the first are two yo-yo kits (chrome and gold plated) dressed in Bolivian Rosewood. I purchased a plank of rosewood last year, and almost forgot I had it in my cabinet. The gold plated kit has a concave face on either side while the chrome plated kit has a slightly raised convex face (a slip of the skew caused that design opportunity, but I'm pleased with the results). Both yo-yos are sanded up to 600 grit, with a denatured alcohol wipe between sanding steps. To finish, I applied a light coat of Danish Oil followed by a high speed buffing with a small amount of Carnauba wax.
All the right conditions fell into place: a very nice spring day, no planned activities or commitments, a couple of acrylic blanks needing to be turned since December...Today was a great day in the workshop. I turned three pens, a couple of yo-yos, and started a real cool (hopefully) segmented blank (that one is going to require a lot of glue...and clamps...lots of clamps). So, from left to right in the images, the first are two yo-yo kits (chrome and gold plated) dressed in Bolivian Rosewood. I purchased a plank of rosewood last year, and almost forgot I had it in my cabinet. The gold plated kit has a concave face on either side while the chrome plated kit has a slightly raised convex face (a slip of the skew caused that design opportunity, but I'm pleased with the results). Both yo-yos are sanded up to 600 grit, with a denatured alcohol wipe between sanding steps. To finish, I applied a light coat of Danish Oil followed by a high speed buffing with a small amount of Carnauba wax.
Submitted by craig on Sun, 03/29/2009 - 2:32am.
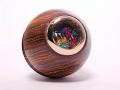
 Spring is finally here in Northwest Ohio. Average temperatures have been in the 50's the past week or so, and that has allowed me to spend much needed time in my garage cleaning up from the "winter of neglect". I was finally able to clean up my lathe, just in time to make a fresh pile of wood shavings. I had a request for a kaleidoscope in no specific wood. I found an old cocobolo bottle stopper blank witch was perfect for the required dimensions. A few months away from wood turning did not seem to erode my skills at all, and it felt good to slip back into my hobby.
Spring is finally here in Northwest Ohio. Average temperatures have been in the 50's the past week or so, and that has allowed me to spend much needed time in my garage cleaning up from the "winter of neglect". I was finally able to clean up my lathe, just in time to make a fresh pile of wood shavings. I had a request for a kaleidoscope in no specific wood. I found an old cocobolo bottle stopper blank witch was perfect for the required dimensions. A few months away from wood turning did not seem to erode my skills at all, and it felt good to slip back into my hobby.login to post comments
Submitted by craig on Thu, 12/25/2008 - 4:19am.

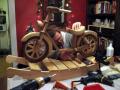
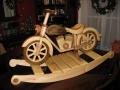 Many cuts later, and much sanding and staining (thanks Jen), the rocking motorcycle is complete. This is a Christmas gift for our nephew, so it's finished with several days to spare. The construction is a mix of pine and poplar. The gas tank and saddle are compound band saw cuts and the rear "springs" are simple napkin rings glued up to a dowel. Jen was beyond helpful in taking over the finishing job. She stained and poly'ed the individual pieces and I completed the final assembly this past weekend and tonight.
Many cuts later, and much sanding and staining (thanks Jen), the rocking motorcycle is complete. This is a Christmas gift for our nephew, so it's finished with several days to spare. The construction is a mix of pine and poplar. The gas tank and saddle are compound band saw cuts and the rear "springs" are simple napkin rings glued up to a dowel. Jen was beyond helpful in taking over the finishing job. She stained and poly'ed the individual pieces and I completed the final assembly this past weekend and tonight.
login to post comments
Submitted by craig on Sun, 12/21/2008 - 12:51am.
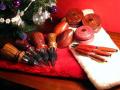
 I think today was the last day of turnings and woodworking for 2008, with 20 degree temperatures and an ice/snow-encased workshop it's time to close it up for the year. I did manage to finish all of my holiday gifts over the past couple of days. I have turned a bunch of exotic hardwood bottle stoppers, kaleidoscopes, yo-yos, and pens of course. The pictures to the right are a small sample of some of the works I've made over the past month, using everything from cocobolo to east india rosewood. So with a few days left before Christmas, the only task left is to divvy up the presents and get them wrapped.
I think today was the last day of turnings and woodworking for 2008, with 20 degree temperatures and an ice/snow-encased workshop it's time to close it up for the year. I did manage to finish all of my holiday gifts over the past couple of days. I have turned a bunch of exotic hardwood bottle stoppers, kaleidoscopes, yo-yos, and pens of course. The pictures to the right are a small sample of some of the works I've made over the past month, using everything from cocobolo to east india rosewood. So with a few days left before Christmas, the only task left is to divvy up the presents and get them wrapped.login to post comments
Submitted by craig on Tue, 11/25/2008 - 2:05am.

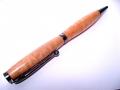
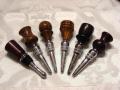
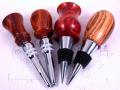 Autumn seems to have taken a colder turn in Northwest Ohio. Gone are the days of 50 degree weekends, to be replaced with 30's and occasional snow. Not to be bested by nature, I have made the best of the colder temps and got some lathe time in. This is fairly important since I have a bulk of Christmas gifts to make yet (although I haven't completely ruled out the possibility of temporarily relocating the lathe to my mother-in-laws heated basement for the winter). So from left to right, we have a couple of different bottle stopper variants. I am really liking the style of the two on the right as the mandrel is much larger and the stopper blanks are a bit easier to manage. The smaller blanks, like the two on the left, require a much lighter touch and can catch quite badly (I broke a mandrel when I found this out the hard way). The next image is a series of pencil extenders which have gone over very well with artist friends. The third and fourth images are matched acrylic European ballpoint pens and letter openers in "granite" and "emerald". The last image is a pen and pencil set in a new style for me. This shape and hardware combination is called "Executive", and this particular set is finished in Bethlehem Olive Wood.
Autumn seems to have taken a colder turn in Northwest Ohio. Gone are the days of 50 degree weekends, to be replaced with 30's and occasional snow. Not to be bested by nature, I have made the best of the colder temps and got some lathe time in. This is fairly important since I have a bulk of Christmas gifts to make yet (although I haven't completely ruled out the possibility of temporarily relocating the lathe to my mother-in-laws heated basement for the winter). So from left to right, we have a couple of different bottle stopper variants. I am really liking the style of the two on the right as the mandrel is much larger and the stopper blanks are a bit easier to manage. The smaller blanks, like the two on the left, require a much lighter touch and can catch quite badly (I broke a mandrel when I found this out the hard way). The next image is a series of pencil extenders which have gone over very well with artist friends. The third and fourth images are matched acrylic European ballpoint pens and letter openers in "granite" and "emerald". The last image is a pen and pencil set in a new style for me. This shape and hardware combination is called "Executive", and this particular set is finished in Bethlehem Olive Wood.
Submitted by craig on Mon, 11/17/2008 - 2:26am.
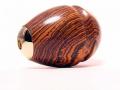
 I took advantage of a day without any pressing obligations and turned a few Yo-Yos for Christmas gifts. We stopped into Woodcraft on Saturday where we found a very nice piece of Cocobolo. I turned three cocobolo yo-yos (say that 5 times fast), one bolivian rosewood, and one mystery wood. I got a chunk out of Woodcrafts grab box a few months back and forgot I had it in my trunk. It's a fairly lightweight wood, definitely not a hardwood, so probably something domestic. So that checks a few things off the "make" list for Christmas...now only about a dozen wine bottle stoppers to create...
I took advantage of a day without any pressing obligations and turned a few Yo-Yos for Christmas gifts. We stopped into Woodcraft on Saturday where we found a very nice piece of Cocobolo. I turned three cocobolo yo-yos (say that 5 times fast), one bolivian rosewood, and one mystery wood. I got a chunk out of Woodcrafts grab box a few months back and forgot I had it in my trunk. It's a fairly lightweight wood, definitely not a hardwood, so probably something domestic. So that checks a few things off the "make" list for Christmas...now only about a dozen wine bottle stoppers to create...
login to post comments
Submitted by craig on Sat, 11/15/2008 - 8:11pm.


 ...but not a total loss either. I started out this morning with a nice big cup of coffee, a Turning guide/manual, and plans to tun some bottle stoppers. Despite the cold and rain/snow mix falling early this afternoon, I had a good practice session on my nemesis, end grain turning. Once I had a few practice blanks turned and felt comfortable with the technique, I figured it was time to try a few bottle stoppers. I ordered a new style of kit which required a different mandrel from what I've been using. Unfortunately for me, I ordered the wrong mandrel. I need a 1 inch 8TPI adapter and I ordered the 3/4 inch 16TPI. Not a big deal as the mandrels are cheap, but more frustrating as it will be next week before I can turn these blanks I've prepped. Determined not to make it a total washout, I had a few additional kits I ordered to try something different. We've been taking art classes for the past nine weeks at the Toledo Museum of Art. The course is introductory drawing and the media is graphite pencils. Some of the pencils we were supplied with are the woodless variety, which are very nice to draw with, but a bit fragile. After snapping one of them, I found an extender kit which would make the nubs a bit easier to use. The kit has a 3/8in barrel which will allow most pencil stubs to "self-store" by flipping around the chrome holder. When stored, it has a nice rounded end. The opposite end houses a large replaceable eraser. The pencil extenders pictured here show the holder and one of my broken woodless pencils for scale.
...but not a total loss either. I started out this morning with a nice big cup of coffee, a Turning guide/manual, and plans to tun some bottle stoppers. Despite the cold and rain/snow mix falling early this afternoon, I had a good practice session on my nemesis, end grain turning. Once I had a few practice blanks turned and felt comfortable with the technique, I figured it was time to try a few bottle stoppers. I ordered a new style of kit which required a different mandrel from what I've been using. Unfortunately for me, I ordered the wrong mandrel. I need a 1 inch 8TPI adapter and I ordered the 3/4 inch 16TPI. Not a big deal as the mandrels are cheap, but more frustrating as it will be next week before I can turn these blanks I've prepped. Determined not to make it a total washout, I had a few additional kits I ordered to try something different. We've been taking art classes for the past nine weeks at the Toledo Museum of Art. The course is introductory drawing and the media is graphite pencils. Some of the pencils we were supplied with are the woodless variety, which are very nice to draw with, but a bit fragile. After snapping one of them, I found an extender kit which would make the nubs a bit easier to use. The kit has a 3/8in barrel which will allow most pencil stubs to "self-store" by flipping around the chrome holder. When stored, it has a nice rounded end. The opposite end houses a large replaceable eraser. The pencil extenders pictured here show the holder and one of my broken woodless pencils for scale.
Submitted by craig on Mon, 11/10/2008 - 3:49am.
| Here are a few turnings for the weekend of November 8th. I have not had much time at the Lathe the past few months as other projects and life in general have taken priority. Daylight savings time (or lack of, I can never keep those straight) now means it's dark by the time I get home so most workshop time is now limited to the weekends. This weekend gave me a good opportunity to produce a few turnings while it rained/snowed on Sunday. All pens are gold plated European Ballpoint Twist style. From left to right through the table: marblewood, white acrylic, aromatic cedar, padauk, emerald acrylic, segmented walnut and maple, and kingwood. The next few weeks will be focused solely on making Christmas gifts for my family, so this may be the last batch of pens for the year. |  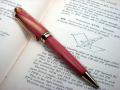  | 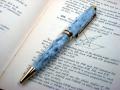  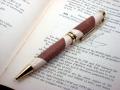 
|
login to post comments
Submitted by craig on Tue, 09/02/2008 - 2:49am.
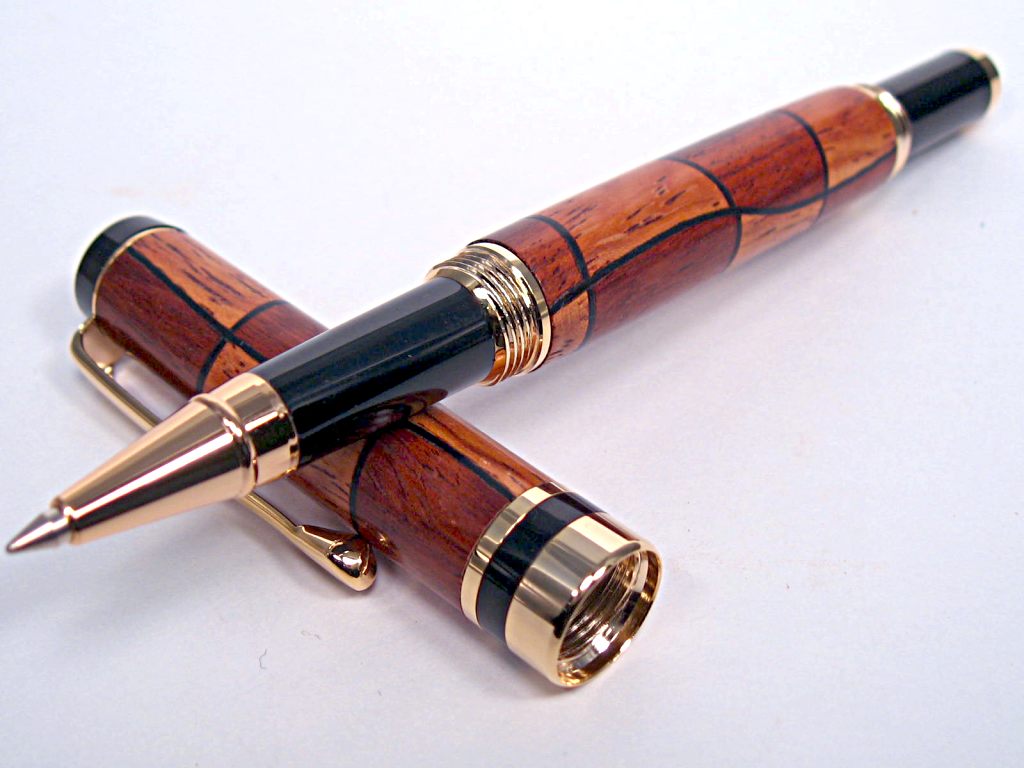
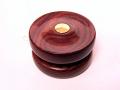
 It has been a wonderful holiday weekend so far. The Fulton County Fair is in full swing, we spent some time at parents house taking advantage of their swimming pool, and I got to spend some time on the lathe. From left to right, the first item is a kaleidescope kit. The style is a lot of fun and affords you many design alternatives. The "gems" are loose and can be replaced with other colors/items. This particular kit is dressed in Tulipwood and finished with CA/BLO and high speed buffing. The second item is actually one I worked on a few weeks ago, it is a purpleheart yo-yo with a gift box made from Japanese cherry and purpleheart. This was actually a gift for my wife who's birthday was this past weekend. I avoided posting a picture until she could open it up. The next item is a new kit style for me called a Panache. This is a very large clipless pen when turned and has a very good weight to it. The mechanism is a rollerball with black chrome hardware and dressed in Wenge. The last item is a European style pen and letter opener commissioned by a good friend who has been holding on to the wood for a year now. The pen and opener are dressed in Black Walnut which came from a downed tree as a result of a storm. The wood dried very nicely over the course of a year and produced a very nice desk set.
It has been a wonderful holiday weekend so far. The Fulton County Fair is in full swing, we spent some time at parents house taking advantage of their swimming pool, and I got to spend some time on the lathe. From left to right, the first item is a kaleidescope kit. The style is a lot of fun and affords you many design alternatives. The "gems" are loose and can be replaced with other colors/items. This particular kit is dressed in Tulipwood and finished with CA/BLO and high speed buffing. The second item is actually one I worked on a few weeks ago, it is a purpleheart yo-yo with a gift box made from Japanese cherry and purpleheart. This was actually a gift for my wife who's birthday was this past weekend. I avoided posting a picture until she could open it up. The next item is a new kit style for me called a Panache. This is a very large clipless pen when turned and has a very good weight to it. The mechanism is a rollerball with black chrome hardware and dressed in Wenge. The last item is a European style pen and letter opener commissioned by a good friend who has been holding on to the wood for a year now. The pen and opener are dressed in Black Walnut which came from a downed tree as a result of a storm. The wood dried very nicely over the course of a year and produced a very nice desk set.login to post comments
Submitted by craig on Sun, 08/10/2008 - 1:59pm.
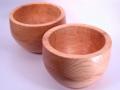
 So after visiting some good friends a few weeks ago, I helped myself to their firewood (with their blessing of course), all of which came from their 2 acre wooded lot. What I have pictured here is my first attempt at splitting down logs using a chainsaw/band-saw and converting them into usable/turnable chunks of lumber. On the far right is a couple of ash bowls which fit comfortably in your hand. When you hold the two of them rim to rim, you can actually see the pith and rings line up. The middle pic is of two lidded containers from a maple tree trunk (a piece of which is in the picture as well). The smaller one was my first attempt which went pretty well until it came to the lid. That blew apart after I had a bad catch because I was using the wrong gouge on the end grain. I recovered/cheated by using a piece of scrap aspen for the lid and a chunk of purpleheart for the finial. The larger container was the second attempt which went better for the lid, but I now realize I need a hollowing gouge for deeper cuts. The pic on the left was a set of acrylics I did as a gift for a fellow artist friend.
So after visiting some good friends a few weeks ago, I helped myself to their firewood (with their blessing of course), all of which came from their 2 acre wooded lot. What I have pictured here is my first attempt at splitting down logs using a chainsaw/band-saw and converting them into usable/turnable chunks of lumber. On the far right is a couple of ash bowls which fit comfortably in your hand. When you hold the two of them rim to rim, you can actually see the pith and rings line up. The middle pic is of two lidded containers from a maple tree trunk (a piece of which is in the picture as well). The smaller one was my first attempt which went pretty well until it came to the lid. That blew apart after I had a bad catch because I was using the wrong gouge on the end grain. I recovered/cheated by using a piece of scrap aspen for the lid and a chunk of purpleheart for the finial. The larger container was the second attempt which went better for the lid, but I now realize I need a hollowing gouge for deeper cuts. The pic on the left was a set of acrylics I did as a gift for a fellow artist friend. login to post comments
Submitted by craig on Sun, 07/27/2008 - 3:22am.

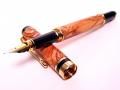
 I spent some time on Friday setting up few blanks for the weekend. The two fountain pens are new kit style called Capri. They are about a third shorter then the Classic fountain pen and also feature rubber gaskets on the post points to reduce the chance of a leak in your pocket or purse. The plating for these two kits are 24kt. The first pen in finished in African Blackwood, which was not my first choice. The first choice was to be cinnamon burl, but the lower tube blew out, much to my disappointment. I salvaged the tubes and remounted them in an old blackwood blank. The second pen is dressed in Madrone Burl, a species found in the Pacific Northwest, which turns and finishes very well, with interesting grain patterns. Last, a turned a couple more yo-yos. After the first one I turned a few weeks ago, I felt more comfortable with the technique and managed to turn both of these in half the time. The hardware is chrome and the material is Bolivian Rosewood.
I spent some time on Friday setting up few blanks for the weekend. The two fountain pens are new kit style called Capri. They are about a third shorter then the Classic fountain pen and also feature rubber gaskets on the post points to reduce the chance of a leak in your pocket or purse. The plating for these two kits are 24kt. The first pen in finished in African Blackwood, which was not my first choice. The first choice was to be cinnamon burl, but the lower tube blew out, much to my disappointment. I salvaged the tubes and remounted them in an old blackwood blank. The second pen is dressed in Madrone Burl, a species found in the Pacific Northwest, which turns and finishes very well, with interesting grain patterns. Last, a turned a couple more yo-yos. After the first one I turned a few weeks ago, I felt more comfortable with the technique and managed to turn both of these in half the time. The hardware is chrome and the material is Bolivian Rosewood.login to post comments
Submitted by craig on Wed, 07/16/2008 - 1:51am.
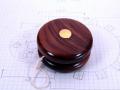 This was a very fun project I've been itching to work on for the past several weeks. I ordered the kits online and finally found some interesting wood to work with last week. Alas, after cutting the board down to size for the two halves, I opened my mandrel and kits to find I was missing the bushings to hold it to the mandrel, and it was a Saturday evening with no chance of getting the replacements for at least a few days. I finally received the bushings this week and had a chance to turn them down this evening after work. The wood is Bolivian Rosewood and the turning was very much unlike pens. I have some technique to learn for sure, and this is not without flaws, but it's shiny and runs pretty true.
This was a very fun project I've been itching to work on for the past several weeks. I ordered the kits online and finally found some interesting wood to work with last week. Alas, after cutting the board down to size for the two halves, I opened my mandrel and kits to find I was missing the bushings to hold it to the mandrel, and it was a Saturday evening with no chance of getting the replacements for at least a few days. I finally received the bushings this week and had a chance to turn them down this evening after work. The wood is Bolivian Rosewood and the turning was very much unlike pens. I have some technique to learn for sure, and this is not without flaws, but it's shiny and runs pretty true.login to post comments